Customer and organization details
Fill customer and organization detail fields from a CSV, with every value checked against the field before anything is written.
Before you start: turn on detail fields
Detail fields (customer and organization "profiles") have to be on for your site before the app can write them. Where to turn them on depends on when your site was created:
- Sites created after October 2025 (Service Collection): create one Customer Service Management space first. You don't have to use it; it switches detail fields on for the site.
- Older sites: in one of your service projects, go to Space settings → Features and turn on Customer and organization profiles.
If neither is done, the Details screen tells you so instead of failing.
Then create the fields you need in Jira Service Management. The app fills fields; it doesn't create them.
Field types
Text, email, URL, date, number, yes/no, phone, select and multi-select. The dry run checks each value against the field's type and, for select fields, its options. Dates as YYYY-MM-DD. Multi-select values separated by ;.
Upload details
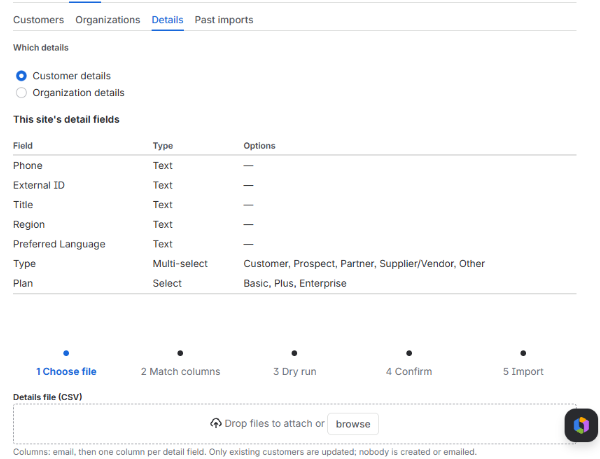
- Import → Details, choose Customer details or Organization details. The screen lists this site's detail fields, their types and, for select fields, their options.
- Upload a CSV under Details file (CSV): the email (customers) or organization name, then one column per field. Start from customer-details-template.csv.
- Match columns, read the dry run (a value that doesn't fit is shown in the row's note), and confirm. The button reads, for example, Write 120 detail values · no emails.
A details upload only updates customers and organizations that already exist: an email or organization name it can't find is an error on that row, never a new account or organization, and nobody is invited. A row with a value that doesn't fit its field is skipped as a whole, so you can fix it and upload just that row again.
You can also put detail columns straight into a customers or organizations import.
Undo
The app remembers each value it replaced. Undoing the import puts the old value back — unless someone changed it since, in which case it's left alone. The undo result lists those (2 values were changed by someone since the import and were left as they are) with a CSV download, and Past imports keeps a button for them (2 values left as they were).